


Server Protection: A Complete Linux Security Guide
Server security is the foundation of stable operation for any business, startup or ordinary website. In 99% of cases, incidents on customer servers happen because of a breach, and a breach itself is the result of insufficient server protection.
In this article we cover the most effective ways to protect a server. We start with the minimal necessary measures and finish with advanced protection. The material is aimed primarily at beginners, but any system administrator can use it as a handy checklist.
Every instruction is kept as simple as possible. Even if you are connecting to a server for the first time, do not worry - you will figure everything out.
#Linux: basic setup
By default the sudo command may not work on Debian. You may need to install the package with apt install sudo, or simply remove sudo from the commands used.
Before you start, make sure the nano text editor is available in your system.
Ubuntu / Debian
sudo apt install nanoCentOS
yum install nano#Regular system updates
This is the basic and key security measure for any server. If a vulnerability is discovered in the system, it is important to be among the first to install the update and fix the problem. A single command noticeably reduces the risk of a breach.
Ubuntu / Debian
sudo apt update && sudo apt upgrade -yCentOS
sudo yum update -y#Using SSH keys
With SSH keys, brute-forcing a password becomes simply unrealistic. Just imagine - the number of possible key combinations reaches 2 to the power of 2048.
The process of using SSH keys and disabling password access to the server is described in detail in a separate article - we recommend reading it.
#Changing the SSH port
Port 22, the standard one for SSH, has long been a target for attackers. Scanners and bots constantly probe the internet looking for servers open on this port. Their goal is to find an accessible server and start guessing passwords from a huge database of simple and popular combinations.
The result of this activity is logs overflowing with messages about failed connections, which makes analysing real threats harder. Changing the port significantly reduces this noise and makes the server less visible to such attacks.
A simple solution is to replace port 22 with a non-standard one, any you like. For example, 50321. First, make sure the chosen port is not used by another application. For this we will use the netstat utility from the net-tools package.
Ubuntu / Debian
sudo apt install net-toolsCentOS
sudo yum install net-toolsLet us check port 50321. This value is chosen only as an example - you can use any other free port.
sudo netstat -tuln | grep 50321If the command returned nothing, the port is free. For comparison, let us check port 22 and confirm that it is indeed busy and in use.

Open the SSH server configuration with the nano editor.
nano /etc/ssh/sshd_configRemove the # symbol in the Port line and replace 22 with the value you want. In our case it is 50321. The result should look like this.
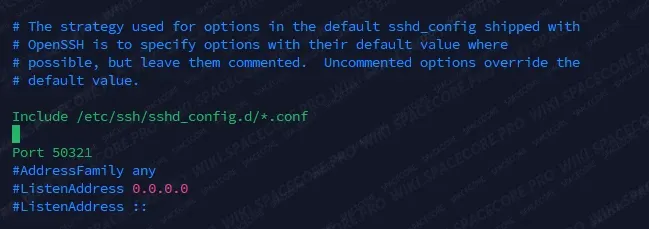
Switch the keyboard layout to English and press CTRL+X, then Y and Enter to save the file. After that, restart the SSH service.
Ubuntu / Debian
sudo systemctl restart sshCentOS
sudo systemctl restart sshdAfter the restart, do not rush to close the current server window. Keep it open for a while. If something goes wrong, you will be able to roll back the changes. In a new window, try to connect to the server using the new port.
#Backing up data
The basic security setup could end at these three points. Regular updates, SSH keys and a non-standard SSH port together produce a huge effect and reduce the chance of a breach by 90-95% compared to default settings. For an inexperienced user who does not store highly confidential data on the server, this is more than enough.
Even so, you should never forget about data backups. This is an excellent rule that helps not only when working with servers but also in your own projects. No hosting provider can guarantee one hundred percent safety of your data. Situations vary - from a simple disk failure to major incidents in a data center. Such cases are rare, but it is not worth tempting fate.
Let us look at this in practice. For Ubuntu, Debian and CentOS you can use the built-in tar utility.
tar -cvzf /path/to/backup.tar.gz /path/to/folder- /path/to/backup.tar.gz - the path and name of the archive.
- /path/to/folder - the path to the folder that will be archived. You can specify a particular file or the * symbol to add all contents of the current directory to the archive.
For example, let us archive the share folder from the root directory /root. First, make sure we are in the right directory.
cd /rootThen run the archiving with tar.
tar -cvzf backup.tar.gz shareAfter the archiving finishes, run the ls command and make sure the file was actually created.
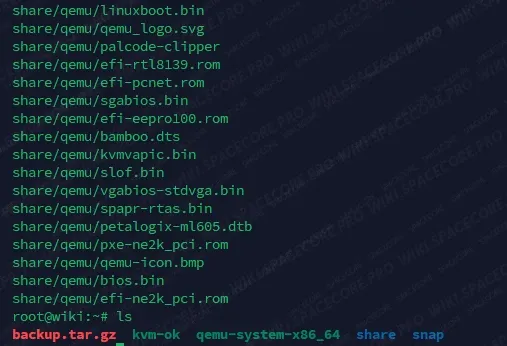
From here you can handle the archive in different ways. You can download it to your computer over sFTP or upload it to cloud storage. A manual copy once every two weeks is usually enough, although it depends on the type of project. For large projects, archiving and uploading to external storage can be automated with Cron, even at a 24-hour interval.
#Linux: advanced protection
#Configuring the firewall
We will use the iptables utility - it is built into Ubuntu, Debian and CentOS. You can view the current rules like this.
sudo iptables -L -v -nTo avoid losing access to the server, first explicitly allow the SSH port. Specify your port in the --dport parameter. In our example this is port 50321.
sudo iptables -A INPUT -p tcp --dport 50321 -m conntrack --ctstate NEW,ESTABLISHED -j ACCEPTBelow are commonly used iptables commands. We recommend choosing the firewall configuration individually for your own tasks.
Block all traffic from a specific address. The -s parameter specifies the source address.
sudo iptables -A INPUT -s 192.168.1.100 -j DROPBlock incoming traffic on a specific port. The --dport parameter specifies the port to block.
sudo iptables -A INPUT -p tcp --dport 8080 -j DROPTo save the created rules, use the command below.
Ubuntu / Debian
sudo /sbin/iptables-saveCentOS
sudo /sbin/service iptables saveThe iptables setup process is described in detail in a separate article - we recommend reading it.
#Fail2Ban - blocking brute-force attacks
Fail2Ban is an effective tool for improving server security. It monitors the logs of system services and automatically blocks IP addresses that make repeated failed login attempts. This approach protects the server from password guessing and also relieves the logs of unnecessary data.
Installation
Ubuntu / Debian
sudo apt install fail2ban -yCentOS
sudo yum install epel-release
sudo yum install fail2ban
Let us start the service, add it to autostart and check its status.
sudo systemctl start fail2ban
sudo systemctl enable fail2ban
sudo systemctl status fail2ban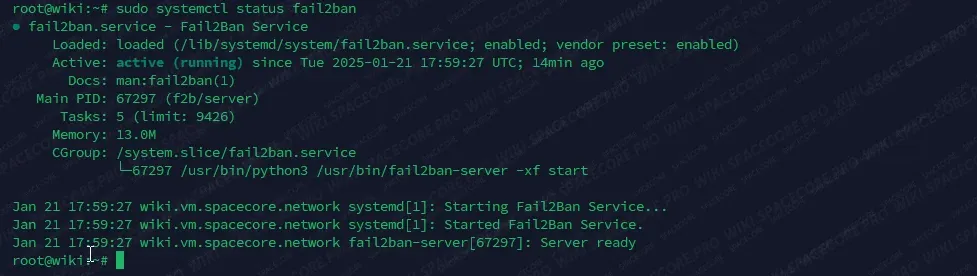
It is not recommended to edit the files /etc/fail2ban/fail2ban.conf and /etc/fail2ban/jail.conf directly - they may be overwritten during updates. Instead, create copies with the .local extension and make your changes there.
sudo cp /etc/fail2ban/jail.conf /etc/fail2ban/jail.localOpen the file in a text editor.
nano /etc/fail2ban/jail.localThe main settings look like this.
[DEFAULT]
# Ignored IP addresses, for example your own IP.
ignoreip = 127.0.0.1/8 ::1

# Ban duration for an IP address.
bantime = 10m

# An IP is banned if it makes maxretry attempts within findtime.
findtime = 10m

# Maximum number of attempts before a ban.
maxretry = 5
You can set your own values, for example stricter ones, as in the screenshot below.
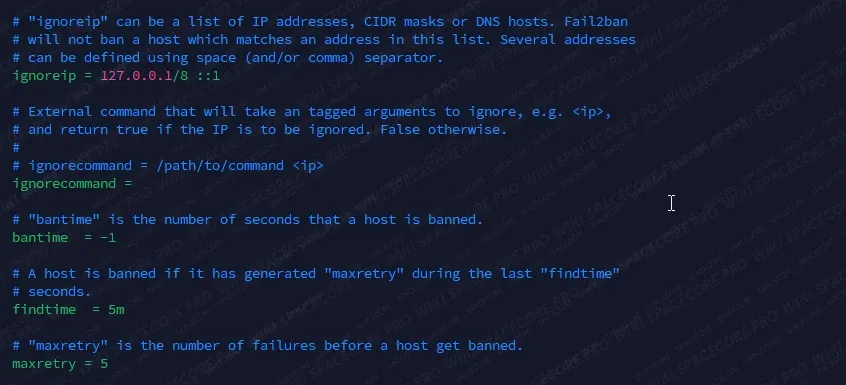
With the value bantime = -1, offending addresses are banned permanently. This is an effective method against bots, but it should be applied carefully to avoid accidentally blocking trusted users.
After making the changes, restart Fail2Ban.
sudo systemctl restart fail2banYou can check the activity log like this.
sudo tail -f /var/log/fail2ban.log#Two-factor authentication with Google Authenticator
Two-factor authentication significantly increases server security. After it is configured, logging in first asks for a one-time OTP code, which is refreshed every 30 seconds, and then for the server password. Keep in mind that you will need your phone every time you log in.
Installing the PAM module
Ubuntu / Debian
sudo apt install libpam-google-authenticatorCentOS
sudo yum install epel-release
sudo yum install google-authenticator
Run the command as the user for whom 2FA is being configured.
google-authenticatorThe system will ask several questions. For the question Do you want authentication tokens to be time-based (y/n) enter y to use time-based one-time passwords (TOTP).
After that, a large QR code will appear, along with data for manual entry and recovery codes. Save the recovery codes in a safe place - you will need them if you lose access to the code generator.
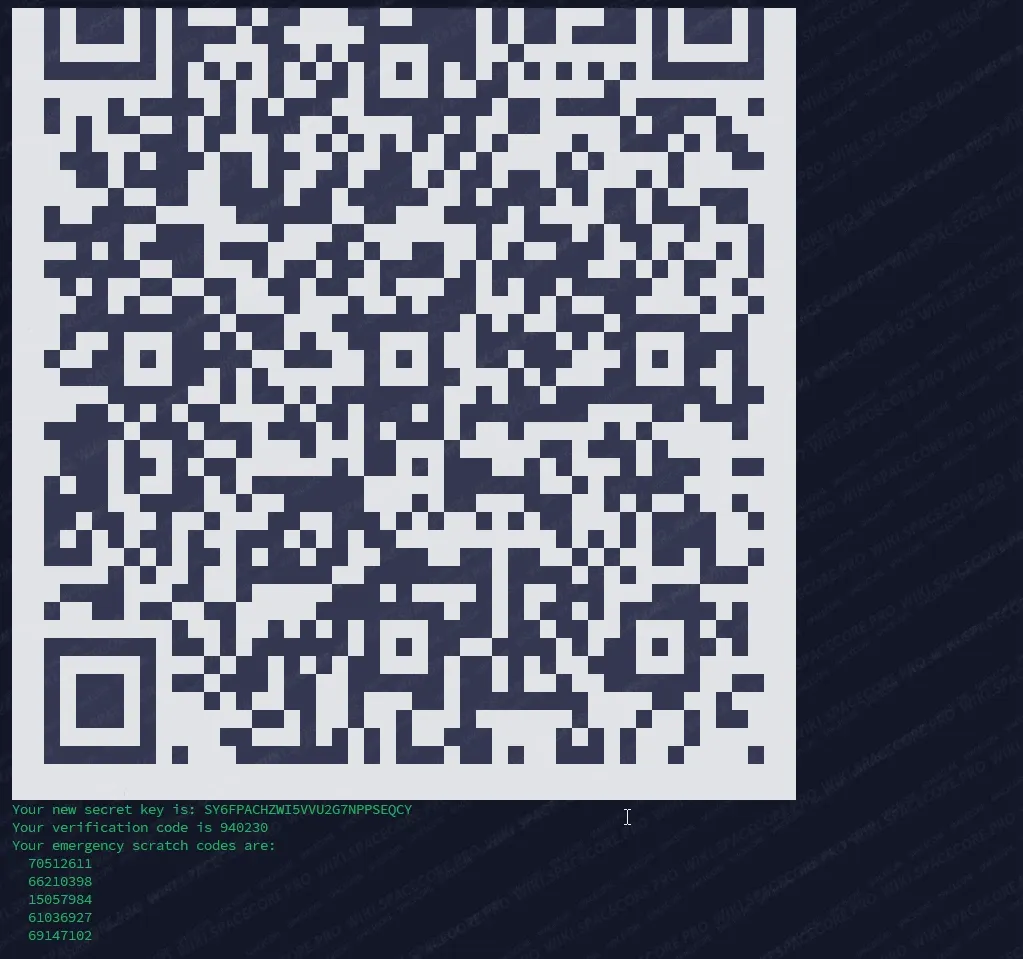
Install the Google authenticator app on your phone: Android or iOS. Scan the offered code, after which the server account will be added to the app.

Answer the remaining questions.
- Update the .google_authenticator file (y/n) - enter y to save the settings.
- Do you want to disallow multiple uses of the same authentication token (y/n) - y is recommended to prevent reuse of the same token.
- Widening the time window - by default a time skew of up to 30 seconds is allowed (3 tokens: previous, current and next). If you have problems with time synchronization accuracy, the window can be widened to 17 tokens and a tolerance of 4 minutes. Enter y if you experience time desynchronization.
- Enable rate-limiting (y/n) - enter y to limit the rate of authentication attempts and protect against brute force.
Open the PAM configuration file for SSH.
sudo nano /etc/pam.d/sshdAdd the following line to the beginning of the file. It tells the system to use the pam_google_authenticator module for authentication.
auth required pam_google_authenticator.so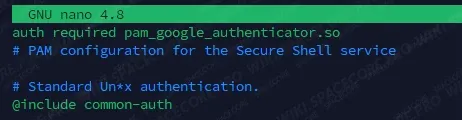
Save and close the file, then open the SSH configuration.
sudo nano /etc/ssh/sshd_configSet the ChallengeResponseAuthentication parameter to yes. This setting enables the use of PAM and requires a one-time password in addition to the main login method.

Save the file and restart the SSH service to apply the settings.
Ubuntu / Debian
sudo systemctl restart sshCentOS
sudo systemctl restart sshdTry to connect to the server. First the system will ask for the authenticator code - enter it.
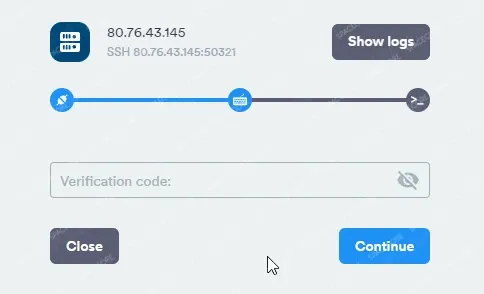
Then enter the server password. The connection is successful.
#ClamAV antivirus
Linux-based operating systems are considered more secure than Windows, but an antivirus can still be useful. This is especially important if you frequently exchange files or use the server in a corporate environment. We will look at the free open-source ClamAV antivirus. It scans the system and detects viruses, trojans, spyware and other types of malware.
Installation
Ubuntu / Debian
sudo apt install clamav -yCentOS
sudo yum install epel-release
sudo yum install clamav clamav-update
After installation, update the virus database. First stop the update service, then run the update manually.
sudo systemctl stop clamav-freshclam
sudo freshclam
Make sure the service is running.
sudo systemctl start clamav-freshclamManual scanning
You can scan a specific folder like this.
clamscan -r /path/to/folderTo scan all files in the system, use the command below.
sudo clamscan -r -i /Did not find the answer? We are online 24/7.Contact support